PIR Motion Sensor Security Alarm Body Detection Motion Security Alarm Circuit Diagram PIR sensors operate using a simple two-pin logic. When the sensor detects motion, it sends a HIGH signal (3.3V or 5V, depending on the sensor) to the output pin. When there is no motion, the sensor outputs a LOW signal (0V). This makes it easy to integrate with Arduino to trigger actions like turning on LEDs or activating alarms.

In this article, We will learn how can we make a Motion Detection System using Arduino. When the PIR Sensor will detect any motion, it will show that on the Serial Monitor and the buzzer will start. Components Required. Arduino UNO -> A microcontroller board based on the ATmega328P; PIR Sensor -> Which detects the motion Along with the pyroelectic sensor is a bunch of supporting circuitry, resistors and capacitors. It seems that most small hobbyist sensors use the BISS0001 ("Micro Power PIR Motion Detector IC"), undoubtedly a very inexpensive chip. This chip takes the output of the sensor and does some minor processing on it to emit a digital output pulse from 2) PIR Motion Detector and Security Alarm Circuit. The following PIR motion sensor circuit can be easily built using the following basic set up and applied as a anti-theft alarm circuit. As the figure shows, the PIR only requires a single 1K resistor, transistor and a relay to be configured externally.

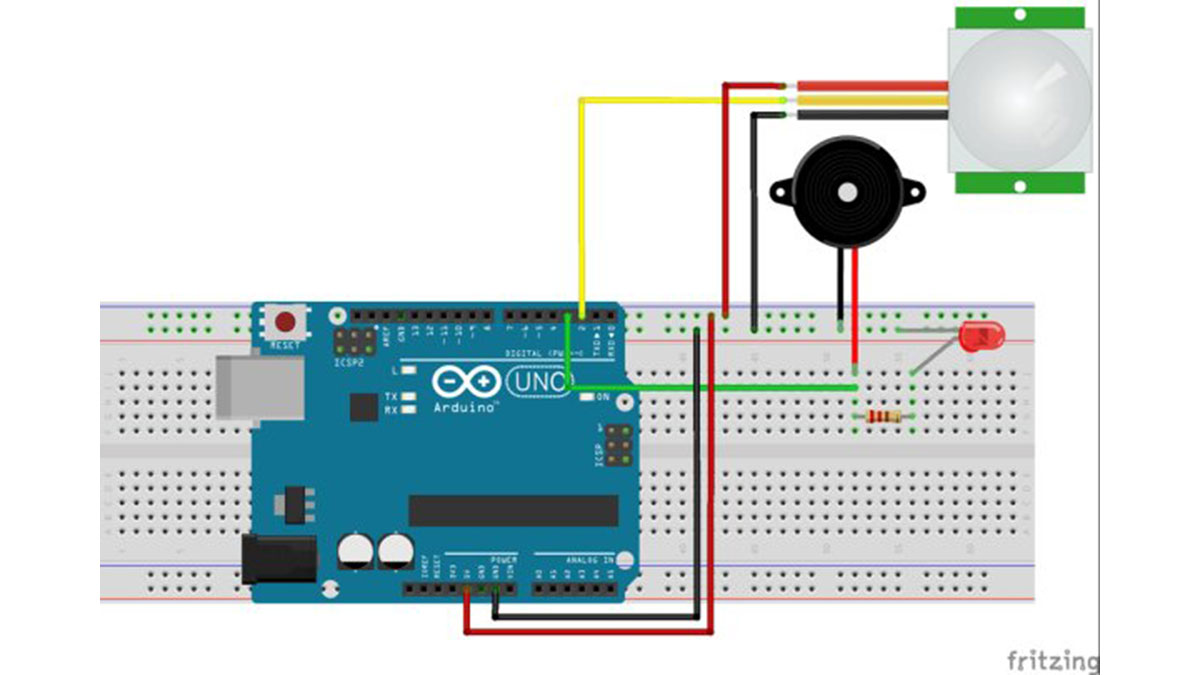
How to Setup Passive Infrared (PIR) Motion Sensors on the Arduino Circuit Diagram
How to Use a PIR Motion Sensor With Arduino : I ordered a PIR motion sensor recently and thought it would be easy to set up. The sensitivity controls the distance the sensor will detect motion. This part is really just preference. I am fine with having the sensitivity to be in the middle, but in the future I may mess with it more. Step 3 Unlock the power of motion detection with Arduino! In this video, we'll show you how to use a Passive Infrared (PIR) sensor with Arduino to detect motion and

PIR sensors like the HC-SR501 detect motion by measuring changes in infrared radiation across the sensor. The sensor element actually has two separate sensing elements: The two sensing elements allow the sensor to differentiate between static sources of IR light like sunlight, and moving sources like humans and animals. The PIR sensor is adjustable by hand if you look at the back. I needed to do some minor tweaks to get the sensor more sensitive before I pushed too far on the code. The first part is changing the Trigger Mode from low to high. It is a tiny jumper at the top right-hand side of the sensor with L and H labeled (refer to the PIR diagram). When motion is detected by the sensor, the program will print "Object detected" once and then continue to print "No object in sight" every second until the sensor no longer detects motion. The program will then go back to waiting for motion detection. To know more about PIR Sensor using Arduino refer to this link . Examples of PIR Sensor